

Valentine’s Day is the perfect excuse to whip up some homemade treats that show your love in a delicious way. From sweet sweets to chocolatey delights, these 9 irresistible recipes will charm your special someone and fill your kitchen with heartwarming aromas. Get ready to impress with your baking skills and create a memorable celebration at home!
Chocolate Fondue with Assorted Dippers

Chocolate fondue is a delightful way to celebrate Valentine’s Day, combining rich, melted chocolate with a variety of sweet treats for dipping. This interactive dessert is not only simple to prepare, but it also adds a fun element to your romantic evening. The smooth, creamy chocolate pairs perfectly with fresh fruits, cookies, and marshmallows, making it a crowd-pleaser for anyone with a sweet tooth.
Creating your own chocolate fondue at home means you can customize the dippers to your liking. Whether you prefer strawberries, pretzels, or even cake pieces, the options are endless. Gather your favorite dippers, melt some chocolate, and get ready for a cozy and delicious dessert experience!
Ingredients
- 8 oz semisweet chocolate, chopped
- 1/2 cup heavy cream
- 1 tsp vanilla extract
- Fresh strawberries
- Banana slices
- Marshmallows
- Assorted cookies (like shortbread or graham crackers)
- Mini pretzels
Instructions
- Prepare the Chocolate: In a medium saucepan over low heat, combine the chopped chocolate and heavy cream. Stir continuously until the chocolate is completely melted and smooth.
- Add Flavor: Once melted, stir in the vanilla extract and mix well.
- Setup: Pour the chocolate mixture into a fondue pot or a heat-safe bowl. Keep warm over a low flame if using a fondue pot.
- Prepare Dippers: Arrange your fresh fruits, cookies, and marshmallows on a large platter around the chocolate pot.
- Serve: Use fondue forks or skewers to dip your selected treats into the warm chocolate and enjoy!
Raspberry Mousse in Mini Glasses
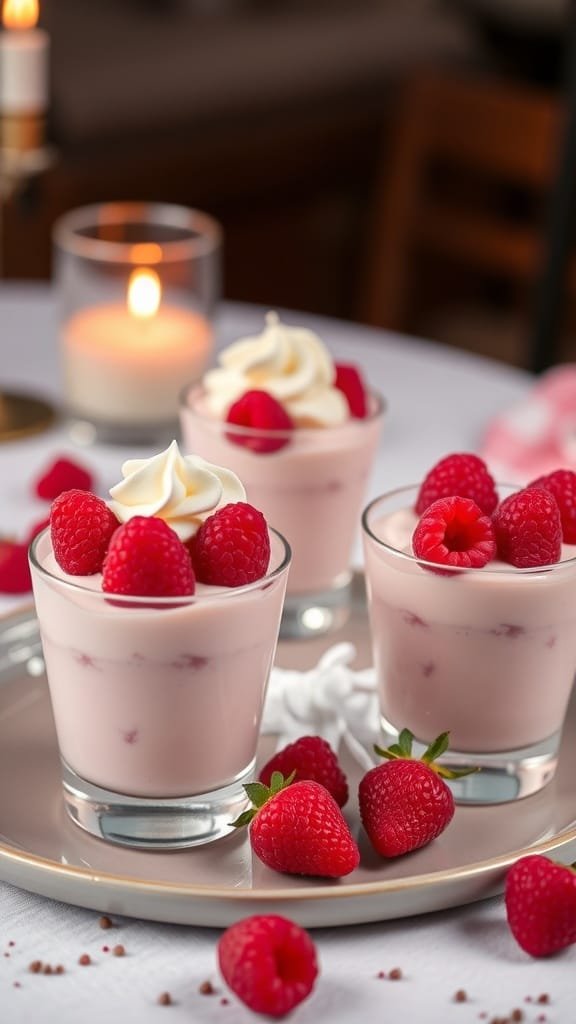
This raspberry mousse is a delightful treat that’s perfect for Valentine’s Day. With its light and airy texture, it offers a burst of fruity flavor that is both refreshing and indulgent. The sweetness of the raspberries balances beautifully with the creamy base, making it a favorite among dessert lovers.
Not only is this treat delicious, but it’s also quite simple to make. Gather some fresh raspberries, cream, and a few other ingredients, and you’ll be on your way to creating these charming mini glasses of joy. They serve as a lovely conclusion to any romantic meal or a sweet surprise for your loved one!
Ingredients
- 1 cup fresh raspberries
- 1/4 cup granulated sugar
- 1 tablespoon lemon juice
- 1 cup heavy cream
- 1/2 teaspoon vanilla extract
- 2 tablespoons powdered sugar
- Additional raspberries for garnish
Instructions
- In a blender, combine the raspberries, granulated sugar, and lemon juice. Blend until smooth, then strain through a fine-mesh sieve to remove the seeds.
- In a separate bowl, whip the heavy cream, vanilla extract, and powdered sugar until soft peaks form.
- Gently fold the raspberry puree into the whipped cream until well combined, being careful not to deflate the mixture.
- Divide the mousse into mini glasses and chill in the refrigerator for at least 2 hours.
- Before serving, top each glass with additional fresh raspberries for a beautiful presentation.
Heart-Shaped Sugar Cookies

Heart-shaped sugar cookies are the perfect sweet treats to celebrate Valentine’s Day. With their buttery flavor and soft texture, these cookies melt in your mouth, making them an irresistible delight for anyone with a sweet tooth. Plus, they’re simple to make, making them a fun project for both beginners and seasoned bakers.
Decorating these cookies is just as enjoyable as baking them. You can use royal icing to create beautiful designs, or keep it simple with a dusting of powdered sugar. Whether you’re crafting them for a loved one or a festive gathering, these holiday confections are sure to spread joy and sweetness!
Ingredients
- 2 3/4 cups all-purpose flour
- 1 teaspoon baking soda
- 1/2 teaspoon baking powder
- 1 cup unsalted butter, softened
- 1 1/2 cups white sugar
- 1 egg
- 1 teaspoon vanilla extract
- 1/2 teaspoon almond extract
- 3 to 4 cups royal icing (for decorating)
- Food coloring (for icing)
- Sprinkles (optional)
Instructions
- Preheat your oven to 375°F (190°C).
- In a small bowl, stir together flour, baking soda, and baking powder. Set aside.
- In a large bowl, cream together the butter and sugar until smooth. Beat in the egg, vanilla extract, and almond extract.
- Gradually blend the dry ingredients into the butter mixture until fully combined.
- Roll out the dough on a floured surface to about 1/4 inch thick. Use a heart-shaped cookie cutter to cut out cookies and place them on ungreased baking sheets.
- Bake for 8 to 10 minutes in the preheated oven, or until lightly golden. Let cool on the baking sheet for a few minutes before transferring to wire racks to cool completely.
- Once cooled, decorate with royal icing colored as desired, and add sprinkles if you like.
Red Velvet Cake Pops

Red velvet cake pops are a delightful spin on a classic dessert. These sweet treats combine the rich, velvety flavor of red velvet cake with the fun, bite-sized format of cake pops. Coated in chocolate and decorated with colorful sprinkles, they are a festive addition to any Valentine’s Day celebration. Plus, they’re surprisingly easy to make, making them perfect for both seasoned bakers and those new to DIY desserts.
These cake pops are not just beautiful; they are also packed with flavor, thanks to the signature cocoa and buttermilk mix that gives red velvet its unique taste. Whether you’re hosting a romantic dinner or a fun gathering with friends, these holiday confections are sure to impress!
Ingredients
- 1 box red velvet cake mix
- 3 large eggs
- 1 cup vegetable oil
- 1 cup buttermilk
- 1 teaspoon vanilla extract
- 8 ounces cream cheese, softened
- 1 cup powdered sugar
- 12 ounces white chocolate, melted
- Sprinkles for decoration
- Cake pop sticks
Instructions
- Prepare the Cake: Preheat your oven according to the cake mix instructions. In a mixing bowl, combine red velvet cake mix, eggs, oil, buttermilk, and vanilla. Mix until smooth. Pour into a greased cake pan and bake as directed.
- Crumble the Cake: Once the cake has cooled, crumble it into a large bowl. Add softened cream cheese and powdered sugar, mixing until fully combined.
- Form the Pops: Scoop the cake mixture and roll it into small balls, placing them on a baking sheet lined with parchment paper. Insert cake pop sticks into each ball and freeze for about 30 minutes.
- Coat with Chocolate: Dip each pop into melted white chocolate, allowing the excess to drip off. Place back on the parchment and immediately sprinkle with colorful decorations.
- Chill and Serve: Let the pops cool completely until the chocolate hardens. Enjoy these delicious red velvet cake pops at your Valentine’s Day celebration!
Strawberry Shortcake Parfaits
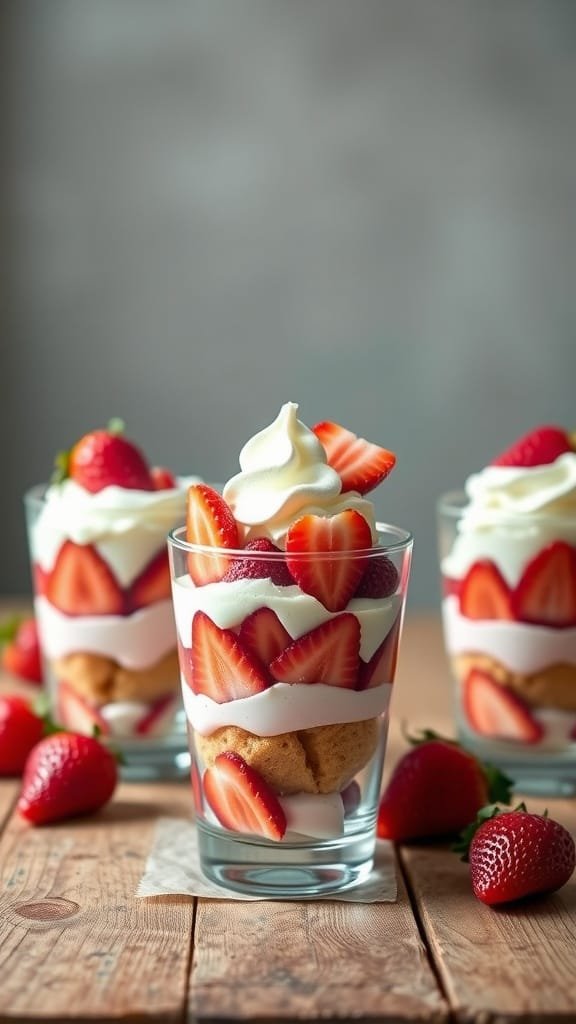
Strawberry shortcake parfaits are a delightful treat perfect for celebrating love on Valentine’s Day. These layers of fluffy cake, fresh strawberries, and whipped cream create a light and refreshing dessert that’s not only delicious but also visually appealing. Ideal for a romantic evening, these parfaits are simple to prepare, making them a fantastic choice for those new to DIY desserts.
Fresh strawberries add a burst of flavor, while the creamy layers balance the sweetness beautifully. Serve them in clear glasses to showcase the lovely layers, and you’ll impress your date with minimal effort. Let’s get started on these sweet treats that are sure to make your Valentine’s Day memorable!
Ingredients
- 2 cups fresh strawberries, hulled and sliced
- 1 cup heavy whipping cream
- 1/4 cup powdered sugar
- 1 teaspoon vanilla extract
- 1 cup pound cake, cut into cubes
- 1/2 cup strawberry puree (optional)
Instructions
- Prepare the Strawberries: In a bowl, combine sliced strawberries with a tablespoon of sugar and let them sit for about 10 minutes to release their juices.
- Whip the Cream: In a mixing bowl, combine heavy whipping cream, powdered sugar, and vanilla extract. Whip until soft peaks form.
- Assemble the Parfaits: In glasses, layer the pound cake cubes, whipped cream, fresh strawberries, and strawberry puree (if using). Repeat the layers until the glasses are full.
- Garnish and Serve: Top with additional whipped cream and a few strawberry slices for decoration. Chill in the refrigerator for about 30 minutes before serving.
Chocolate-Covered Strawberries with a Twist

Chocolate-covered strawberries are a classic treat that brings a touch of romance to any occasion. With just a few ingredients, you can create sweet treats that are not only delicious but also visually stunning. Adding a twist to this simple DIY dessert elevates them to a whole new level, making them perfect for Valentine’s Day or any special celebration.
The combination of fresh strawberries and rich chocolate creates a delightful contrast in flavors and textures. This recipe is super easy to follow, making it a fun activity to do with a partner or friends. Get creative with your toppings and colors to personalize these holiday confections!
Ingredients
- 1 pound fresh strawberries, washed and dried
- 8 ounces dark chocolate, chopped
- 4 ounces white chocolate, chopped
- 1 tablespoon coconut oil (optional, for smooth melting)
- Assorted toppings (sprinkles, crushed nuts, pink melting chocolate)
Instructions
- Melt the Dark Chocolate: In a microwave-safe bowl, combine the dark chocolate and coconut oil. Microwave in 30-second intervals, stirring between each, until fully melted and smooth.
- Dip the Strawberries: Hold each strawberry by the green stem and dip it into the melted dark chocolate, swirling to coat evenly. Allow any excess chocolate to drip off.
- Cool the Strawberries: Place the dipped strawberries on a parchment-lined baking sheet. Let them cool in the fridge for about 15-20 minutes until the chocolate is set.
- Melt the White Chocolate: Repeat the melting process with the white chocolate, using the same method.
- Add Decorative Drizzle: Once the dark chocolate is set, drizzle the melted white chocolate over the strawberries in a zigzag pattern. For extra flair, use colored melting chocolate to create more designs.
- Sprinkle Toppings: While the chocolate is still wet, sprinkle your choice of toppings over the strawberries.
- Final Chill: Return the decorated strawberries to the fridge for another 10 minutes to let everything set.
Cupid’s Arrow Fruit Skewers
Cupid’s Arrow Fruit Skewers are a delightful and healthy way to celebrate Valentine’s Day. They combine the sweetness of fresh fruit with the fun of DIY desserts, making them a perfect treat for loved ones. Not only are these skewers visually appealing, but they also burst with flavor, bringing a refreshing twist to the holiday confections.
Making these skewers is incredibly simple. All you need are your favorite fruits and some charming presentation. Ideal for parties or as a sweet snack, these skewers can be customized to suit any taste. Whether you choose strawberries, melon, or blueberries, each bite is a guaranteed hit!
Ingredients
- 1 cup strawberries, hulled and halved
- 1 cup melon, cubed
- 1 cup blueberries
- 1 cup pineapple, cubed
- 1 cup cheese cubes (cheddar or mozzarella)
- Skewers or toothpicks
- Mint leaves for garnish (optional)
Instructions
- Prep the Fruits: Wash and cut the strawberries, melon, and pineapple into bite-sized pieces.
- Assemble the Skewers: Alternate threading the fruits and cheese cubes onto the skewers. Be creative with the arrangement for a colorful display!
- Serve: Arrange the finished skewers on a platter and garnish with mint leaves if desired. Enjoy your sweet treats!
Homemade Chocolate Truffles

Making homemade chocolate truffles is a fun and delicious way to celebrate Valentine’s Day. These sweet treats are rich, creamy, and can be customized with your favorite flavors. Their melt-in-your-mouth texture makes them a delightful gift or a special treat for yourself.
The process is simple and requires minimal ingredients, making it perfect for all skill levels. You can easily whip up a batch in no time, and the best part is that you can get creative with toppings and fillings. Whether you prefer classic chocolate, fruity, or spicy variations, DIY desserts like these will surely impress!
Ingredients
- 8 oz semi-sweet chocolate, chopped
- 1/2 cup heavy cream
- 1 tsp vanilla extract
- 1/4 cup cocoa powder (for dusting)
- 1/4 cup shredded coconut (for rolling)
- 1/4 tsp cayenne pepper (optional, for a spicy kick)
- Pinch of salt
Instructions
- Heat the Cream: In a small saucepan, heat the heavy cream over medium heat until it begins to simmer. Remove from heat.
- Melt the Chocolate: Add the chopped chocolate to the warm cream. Let it sit for a minute, then stir until smooth and fully melted. Mix in the vanilla extract and a pinch of salt.
- Chill the Mixture: Allow the chocolate mixture to cool to room temperature, then cover and refrigerate for about 1-2 hours until firm.
- Form the Truffles: Once the mixture is chilled, use a small cookie scoop or your hands to shape the chocolate into small balls.
- Coat the Truffles: Roll the truffles in cocoa powder, shredded coconut, or cayenne pepper to coat them as desired.
- Serve: Place the finished truffles on a platter and enjoy your homemade holiday confections!
Red Wine Brownies with Sea Salt
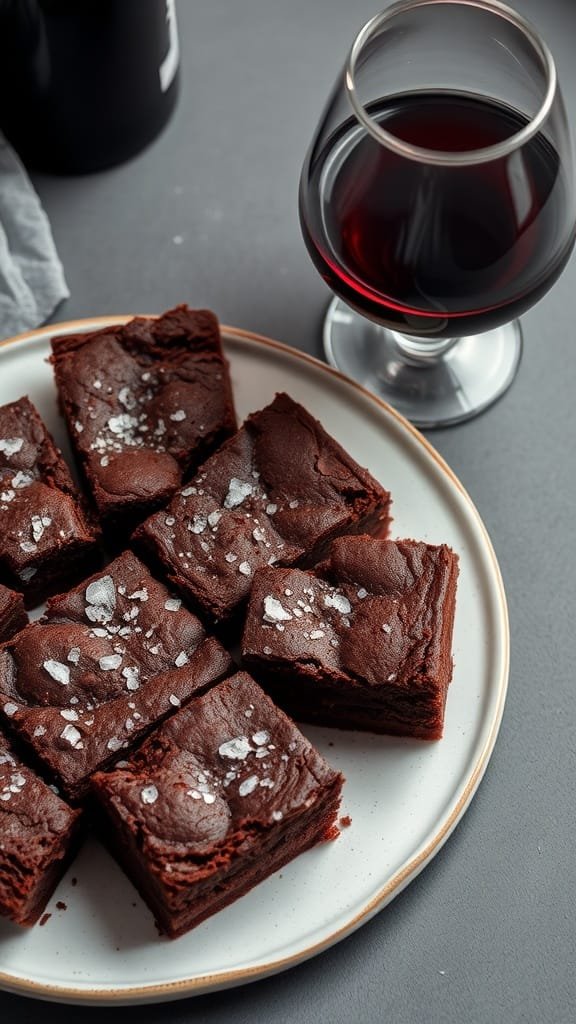
These red wine brownies are the perfect twist on classic chocolate treats, adding a rich depth of flavor that makes them irresistible. The combination of dark chocolate and a splash of red wine creates a moist, fudgy texture that will have your taste buds dancing. Topped with a sprinkle of sea salt, each bite is a delightful mix of sweet and savory.
Making these brownies is a breeze, making them a great option for DIY desserts this Valentine’s Day. Whether you’re surprising a loved one or treating yourself, these sweet treats are sure to impress with their unique flavor profile and simple preparation.
Ingredients
- 1 cup unsalted butter
- 2 cups granulated sugar
- 4 large eggs
- 1 teaspoon vanilla extract
- 1 cup all-purpose flour
- 1 cup unsweetened cocoa powder
- 1/2 teaspoon salt
- 1 cup red wine
- 1 cup chocolate chips
- Sea salt for topping
Instructions
- Preheat your oven to 350°F (175°C). Grease a 9×13 inch baking pan.
- In a saucepan over medium heat, melt the butter. Stir in the sugar until well combined, then remove from heat.
- Allow the mixture to cool slightly, then whisk in the eggs and vanilla extract.
- In a separate bowl, mix the flour, cocoa powder, and salt. Gradually incorporate this dry mixture into the wet ingredients.
- Add the red wine and chocolate chips, mixing until just combined.
- Pour the batter into the prepared baking pan and smooth the top. Bake for 25-30 minutes, or until a toothpick inserted in the center comes out mostly clean.
- Once cooled, sprinkle sea salt on top before slicing into squares. Enjoy your rich red wine brownies!


